

What Is the Best Way to Organize a Pantry?
The best way to organize a pantry is to declutter, clean, group similar items, create zones, and use organizers that fit your shelves. Finish by labeling containers, applying FIFO (first in, first out), and maintaining the system regularly.
- Empty and declutter: Remove expired, damaged, duplicate, or unused food.
- Clean: Wipe shelves and remove crumbs, spills, and dust before restocking.
- Group by category: Keep snacks, canned goods, grains, baking supplies, spices, and breakfast foods together.
- Create zones: Place frequently used items at eye level and organize shelves by meal, food type, or frequency of use.
- Measure shelves: Check shelf width, depth, and height before buying bins, baskets, risers, or containers.
- Choose organizers: Use clear containers for dry goods and open bins for packaged items you access frequently.
- Label: Label containers or zones to make items easy to identify and return.
- Use FIFO: Put older products in front and newer purchases behind them to reduce food waste.
- Maintain: Do a quick weekly reset and check expiration dates and low-stock items regularly.
Key principle: Organize your pantry around how you use it, not simply how the food looks on the shelves. A well-organized pantry makes ingredients visible, accessible, and easier to restock.
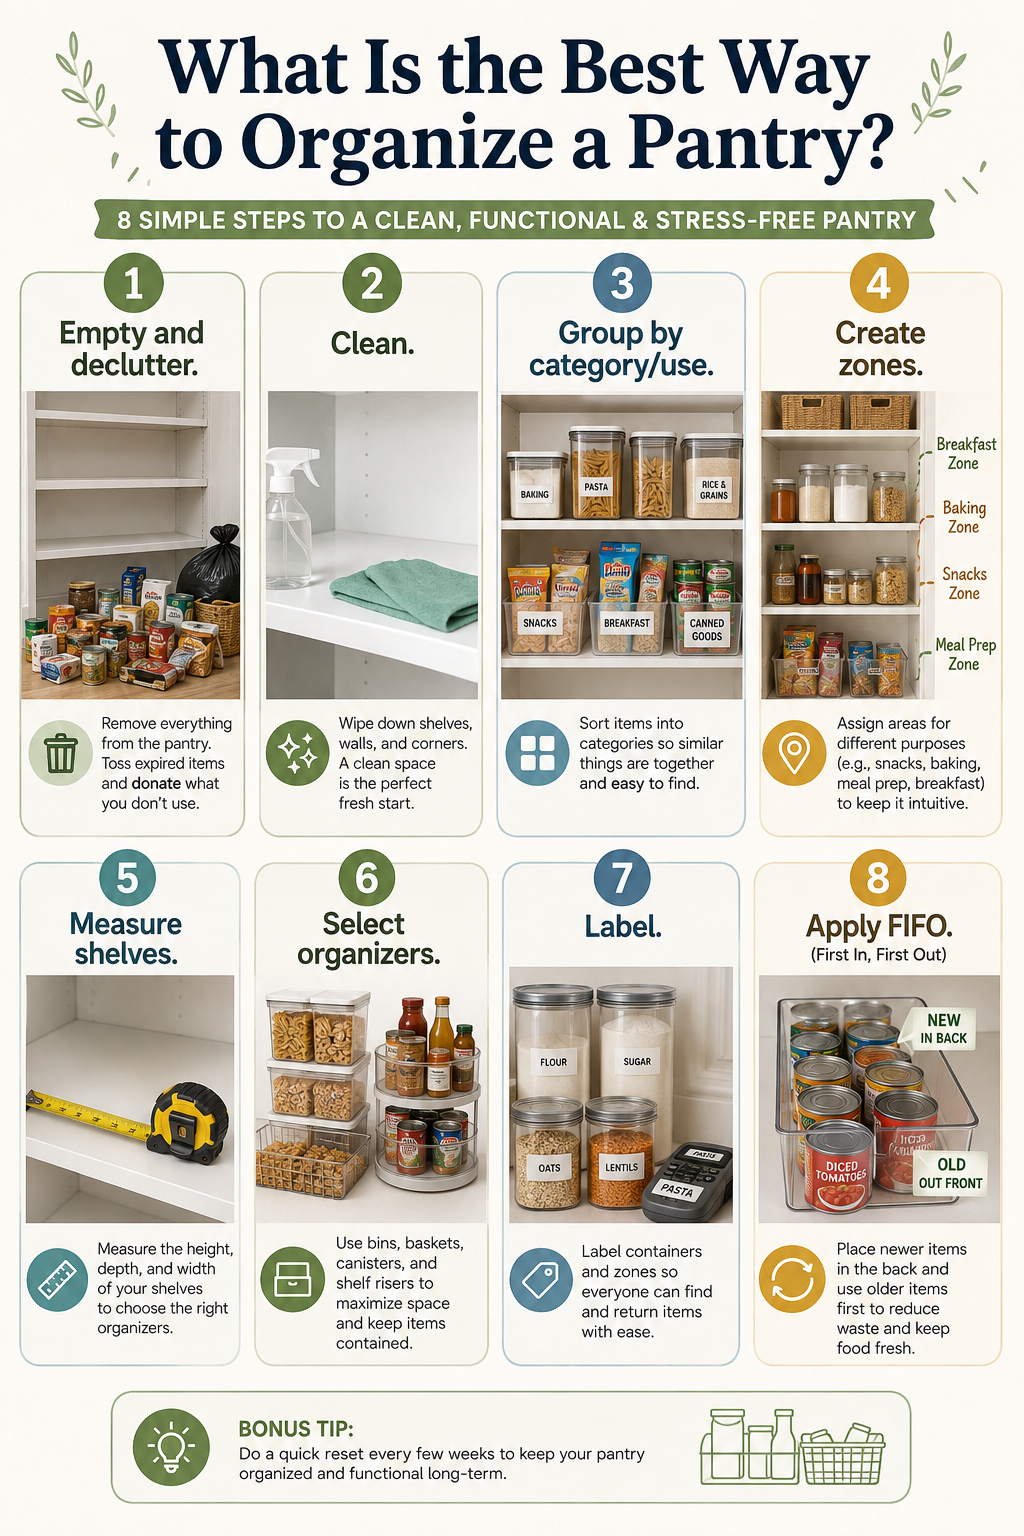
8 Simple steps to organize a pantry, from decluttering and cleaning to labeling and applying FIFO.
25 Pantry Organization Ideas That Actually Make a Difference
The best pantry organization ideas are not about making every shelf look identical. They should make food easy to find, easy to reach, simple to restock, and less likely to expire. The most effective setup combines zones, accessible storage, vertical organization, and a simple maintenance routine.
1. Create Pantry Zones
Divide the pantry into practical zones based on food type or how often you use it. Common zones include breakfast, baking, snacks, canned goods, cooking ingredients, and backstock.
Keep frequently used categories at eye level and less-used items higher or lower. This reduces unnecessary movement and makes the pantry easier to navigate.
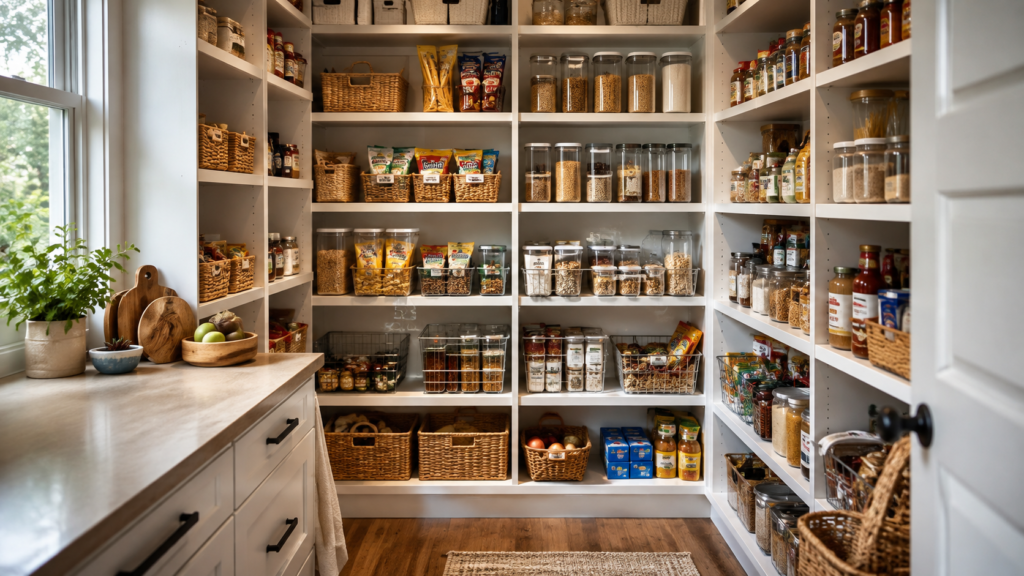
A well-organized home pantry with dedicated zones for snacks, baking ingredients, breakfast foods, and everyday staples.
2. Use Clear Bins for Loose Packages
Clear bins work well for individually packaged snacks, drink mixes, seasoning packets, and other small items that tend to spread across shelves.
Choose open-front or easy-grab bins when possible. You should be able to see and remove an item without taking the entire bin down.
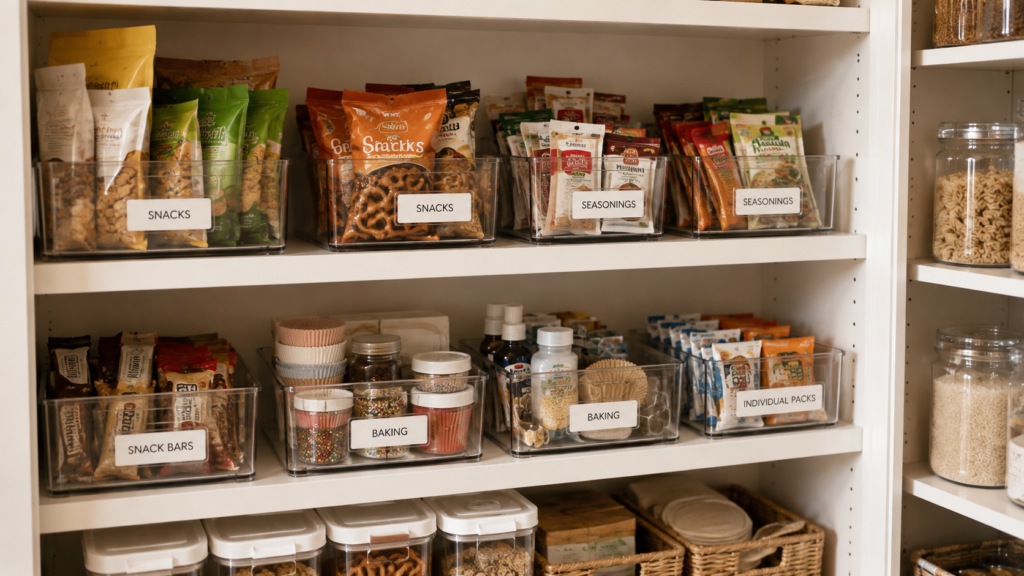
Clear storage bins keep snacks, seasonings, baking supplies, and individual food packs organized and easy to access.
3. Add Shelf Risers
Shelf risers create a second level on tall shelves, making cans, jars, and short containers easier to see.
They are especially useful when there is unused vertical space above a row of products. Avoid using risers on shelves that are already crowded, as they can make access harder.
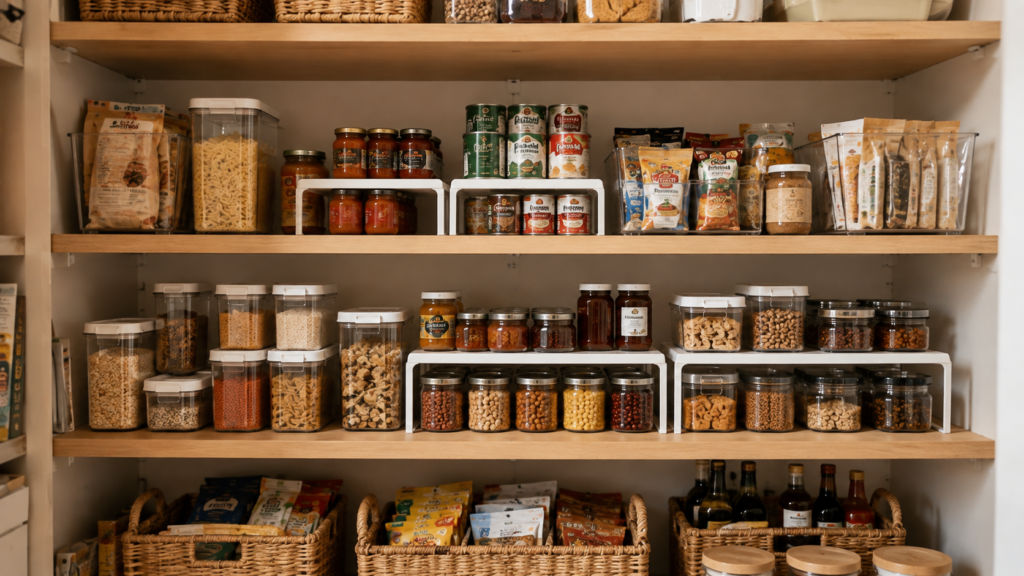
Shelf risers create extra levels so pantry items stay visible and easy to access.
4. Use a Lazy Susan for Corners
A lazy Susan makes corner storage more accessible by bringing items at the back toward you. It works particularly well for sauces, oils, condiments, and frequently used jars.
For best results, avoid overloading it. A single layer of clearly visible products is usually easier to manage than a crowded turntable.
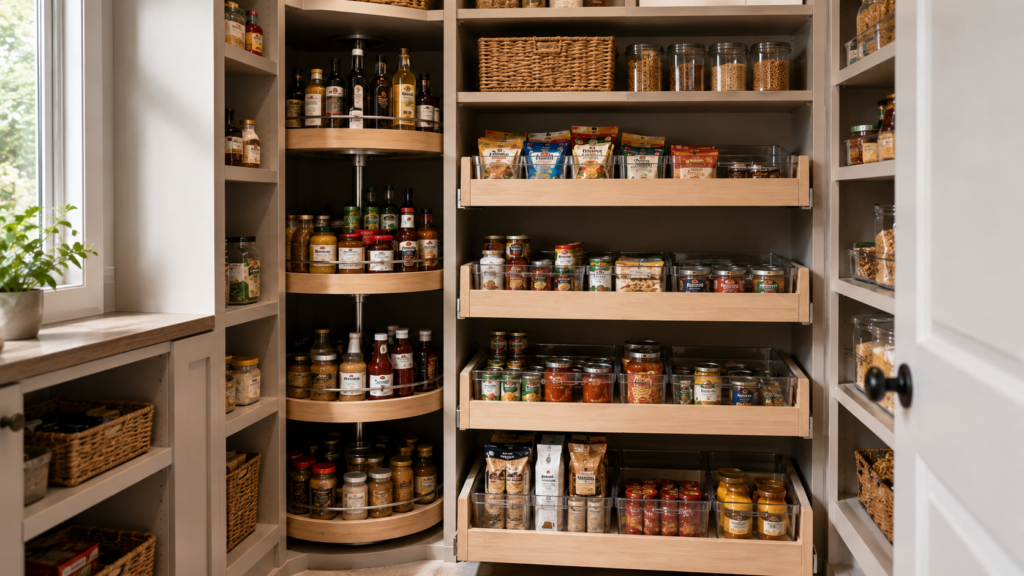
A deep pantry uses a lazy Susan and pull-out bins to keep food accessible and eliminate hard-to-reach spaces.
5. Install Pull-Out Bins for Deep Shelves
Deep pantry shelves often create a common problem: food gets pushed to the back and forgotten. Pull-out bins solve this by turning deep storage into accessible drawers.
Use them for backstock, canned goods, or packaged foods. Measure the shelf depth and opening carefully before installation to ensure the bins can slide out fully.
6. Use the Pantry Door
The pantry door can provide valuable storage for lightweight, frequently used items. Door racks are useful for spices, sauces, snacks, wraps, and small packages.
Keep heavier products off the door unless the hardware is specifically designed to support them. Overloading the door can affect alignment and make it difficult to close properly.
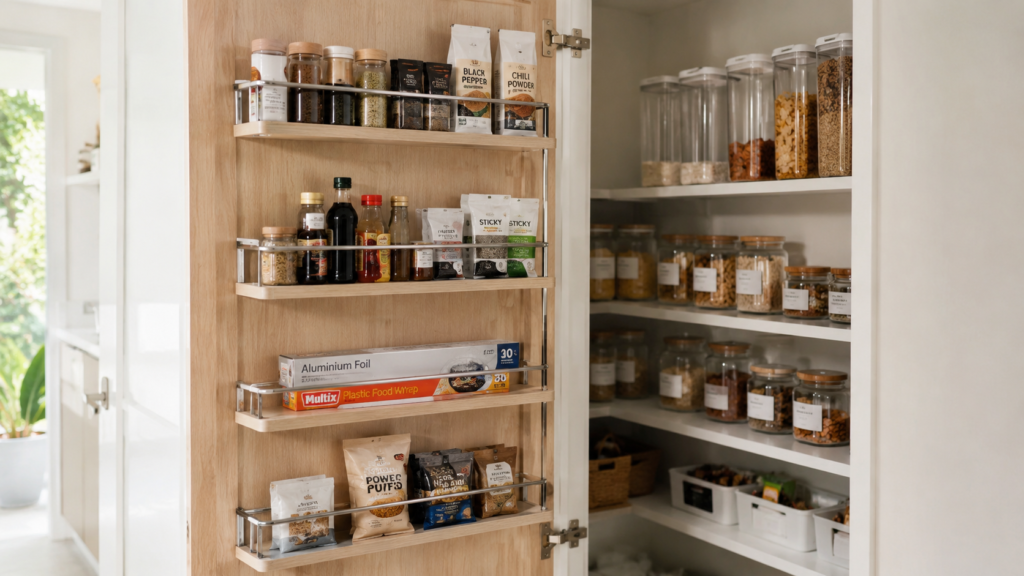
A slim pantry door storage rack adds extra storage space for frequently used spices, sauces, wraps, and pantry essentials while keeping the main shelves organized.
7. Create a Dedicated Snack Zone
A snack zone keeps commonly grabbed foods together and prevents snack packages from taking over multiple shelves.
Use an accessible bin or basket for individually packaged snacks. If several people use the pantry, grouping snacks in one clearly defined area also makes restocking easier.
8. Create a Baking Zone
Keep flour, sugar, baking powder, chocolate chips, sprinkles, extracts, and baking tools together when possible.
A dedicated baking zone reduces preparation time because related ingredients stay within the same area. Store frequently used baking staples in airtight containers when appropriate.
9. Organize Canned Goods Vertically
Arrange cans so labels remain visible rather than stacking them randomly. Shelf risers or tiered can organizers make multiple rows easier to scan.
Place newer cans behind older ones to support FIFO rotation. Avoid excessively high stacks that can become unstable when removing the bottom item.
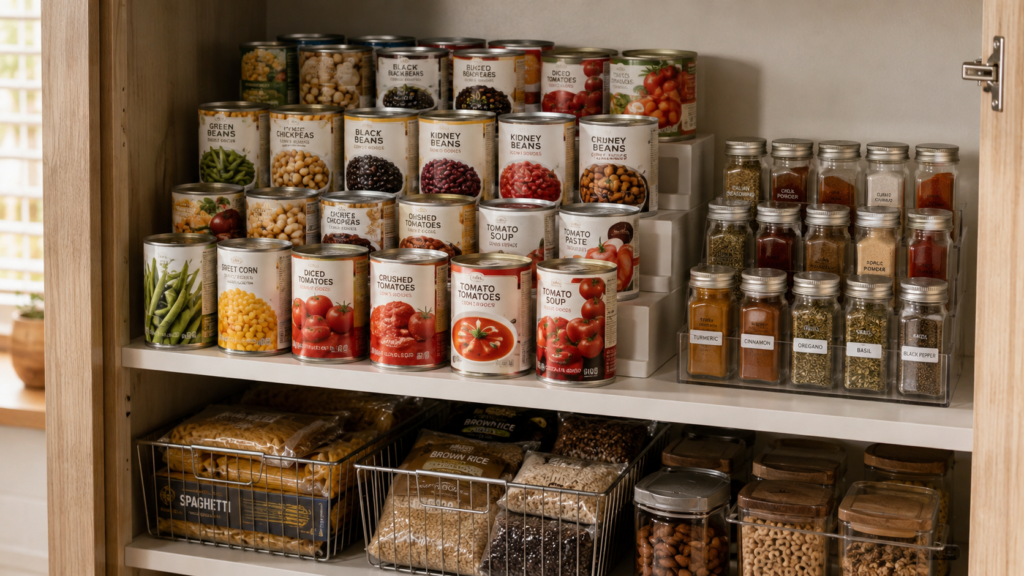
Organized pantry shelf with canned goods and spices arranged for easy access
10. Create a Breakfast Zone
Group cereal, oats, coffee, tea, spreads, pancake mix, and other breakfast staples together.
Position this zone where household members can reach it easily. Keeping breakfast foods together can also prevent frequently used products from becoming scattered across the pantry.
11. Separate Everyday Food From Backstock
Separate the food you use now from extra inventory. Everyday items should occupy the most accessible shelves, while unopened extras can stay in a dedicated backstock area.
This prevents duplicate purchases and makes it easier to see what actually needs replacing.
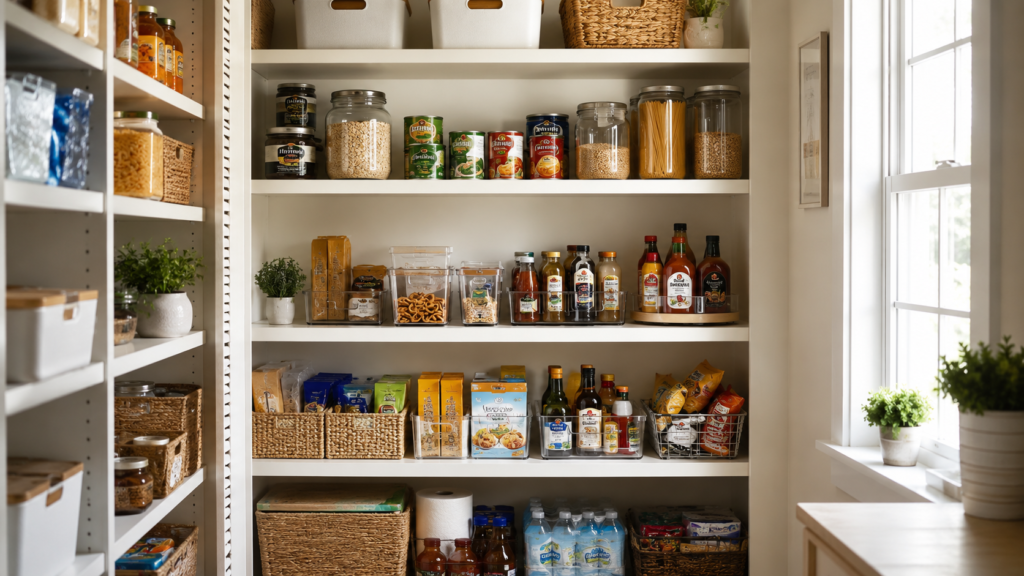
Organized pantry with everyday foods, backstock supplies, and soon-to-use items arranged to reduce food waste
12. Label Shelf Zones
Labels are most useful when they identify where something belongs, rather than labeling every individual package.
Simple labels such as “Snacks,” “Baking,” “Breakfast,” or “Canned Goods” can help everyone maintain the same system. This is particularly useful in shared family kitchens.
13. Use Stackable Containers
Stackable containers make better use of vertical space while keeping dry goods contained.
Choose containers that stack securely and are easy to open. Matching sizes can improve efficiency, but functionality should come before appearance.
14. Use Vertical Space
Look beyond the shelf surface. Risers, stackable bins, narrow racks, and door storage can increase usable capacity without adding another cabinet.
Before adding organizers, check whether the existing shelves can be adjusted. Moving a shelf by only a few inches can sometimes create more useful storage than buying additional products.
15. Store Heavy Items Lower
Place heavy products such as large bags of rice, bulk cans, appliances, or beverage cases on lower shelves.
This makes them safer and easier to lift. Reserve higher shelves for lightweight items that are used less frequently.
16. Use Shallow Bins for Small Items
Small products are easily lost on deep shelves. Shallow bins keep packets, pouches, condiment sachets, and small baking supplies contained without creating a second layer of hidden food.
Choose bins that can be pulled forward easily so the entire contents remain visible.
17. Create a “Use Soon” Area
A small “use soon” section helps prevent food waste. Place opened packages, products approaching their best-by date, or ingredients left over from recent cooking in this area.
The goal is visibility. When these foods are separated from long-term storage, they are more likely to be noticed and used.
18. Keep Kids’ Snacks Accessible
Place suitable children’s snacks on a low shelf or in an easy-to-reach bin. This gives children a defined area without requiring them to search through the entire pantry.
Keep foods that require preparation, supervision, or allergy-related precautions outside this zone as appropriate.
19. Group Foods by Meal
Instead of organizing solely by ingredient type, consider grouping foods around common meals.
For example, pasta, pasta sauce, and related ingredients can occupy one cooking area. Tortillas, taco shells, seasoning, and canned beans can form another. This approach works especially well for households that prepare the same meals regularly.
20. Use Uniform Containers Selectively
Uniform containers can improve visibility and make shelves easier to stack, but replacing every package is rarely necessary.
Prioritize containers for frequently used dry goods, products with awkward packaging, or ingredients that benefit from airtight storage. Keep original packaging when transferring food would add unnecessary work.
21. Keep Original Packaging When Useful
Original packaging often provides useful information such as expiration guidance, cooking instructions, allergens, and product identification.
Do not decant food simply for aesthetic reasons. If the package is already compact, resealable, and easy to store, keeping it may be the more practical choice.
22. Create a Backstock Zone
A dedicated backstock zone prevents extra purchases from mixing with the food currently in use.
When you finish an item, check the backstock before adding it to your shopping list. This simple system reduces duplicates and keeps bulk purchases under control.
23. Organize Spices for Visibility
Store spices so labels face forward and every container can be identified without moving several others.
A tiered spice rack, shallow drawer, or dedicated spice organizer can work well depending on pantry layout. Grouping spices alphabetically is useful for large collections, while grouping them by cooking style may work better for smaller collections.
24. Add a Pantry Inventory
A basic pantry inventory can track staples, backstock, and items that need replenishing.
It does not need to become a complicated spreadsheet. A short list of frequently purchased staples is often enough. Update it when you notice low stock rather than trying to record every item.
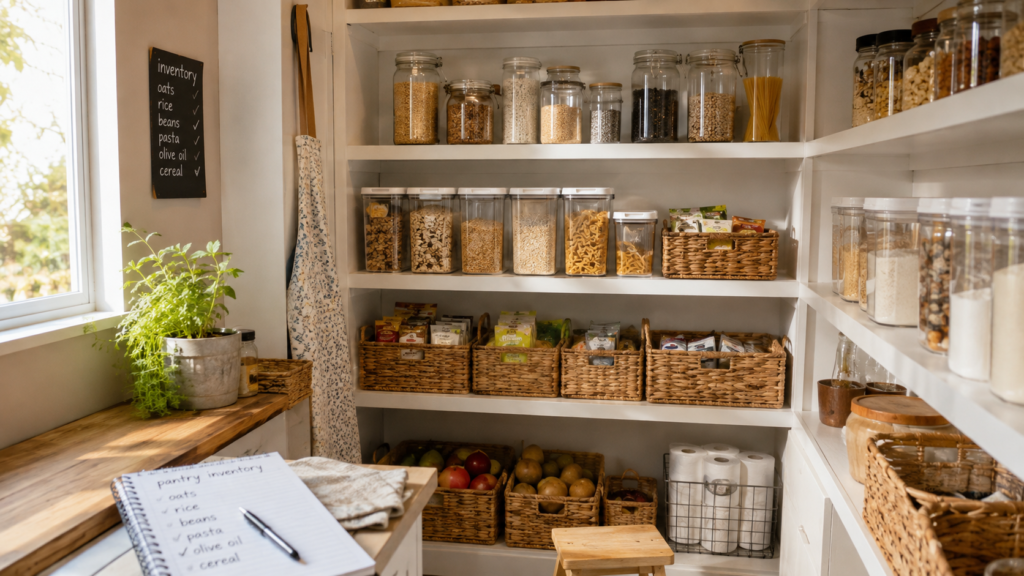
A clean, organized pantry with well-stocked shelves and a simple weekly inventory checklist.
25. Establish a Weekly Reset
A five- to ten-minute weekly reset can prevent a well-organized pantry from becoming cluttered again.
Return misplaced items, bring older products forward, remove empty packages, and check the “use soon” area. Regular small resets are more sustainable than waiting until the pantry requires a complete reorganization.
How to Organize a Small Pantry
Organizing a small pantry is mainly about maximizing vertical space, keeping frequently used food within easy reach, and limiting unnecessary storage. Instead of filling every shelf, create a compact system where each category has a defined place and every inch serves a purpose.
Use Vertical Space
Small pantries often have more unused height than floor space. Add shelf risers, stackable containers, or narrow vertical racks to create additional storage levels without expanding the footprint.
Adjustable shelving is particularly useful because shelf height can be matched to the products being stored. Keep taller items where they fit naturally rather than wasting vertical clearance above short containers.
Prioritize High-Frequency Items
Store the foods you reach for every day at eye or waist level. Common examples include breakfast staples, snacks, coffee, cooking oils, and frequently used canned goods.
Less frequently used ingredients can move to higher shelves. This simple hierarchy makes a small pantry feel more spacious because the most important items remain accessible without moving other products.
Use Door Storage
The inside of the pantry door can provide valuable extra storage for lightweight, frequently used items. A slim door rack works well for spices, sauces, snack packets, wraps, and small pantry supplies.
Keep the door rack shallow enough that it does not interfere with the shelves or prevent the door from closing properly. Avoid placing heavy bulk items on the door.
Choose Narrow Bins
Narrow bins make better use of limited shelf width than large baskets that leave unusable gaps. They are especially useful for snack packets, seasoning mixes, pouches, and small packaged foods.
Choose bins that can be pulled forward easily. A bin that is too deep may simply recreate the same problem as a cluttered shelf by hiding items at the back.
Avoid Oversized Containers
Large storage containers can consume valuable space in a small pantry. Before transferring food, consider the package size, how quickly the food is used, and how efficiently the container stacks.
Use airtight containers where they provide a practical benefit, particularly for frequently used dry goods. For compact or already well-designed packaging, keeping the original package may save space.
Create a Backstock Limit
A small pantry needs a limit on how much extra food it can realistically hold. Keep only a practical amount of backstock for frequently purchased staples and avoid turning every shelf into bulk storage.
A useful approach is to designate one shelf or section for unopened extras. When that space is full, use existing stock before buying more. This prevents duplicate purchases and keeps everyday food from being pushed into hard-to-reach areas.
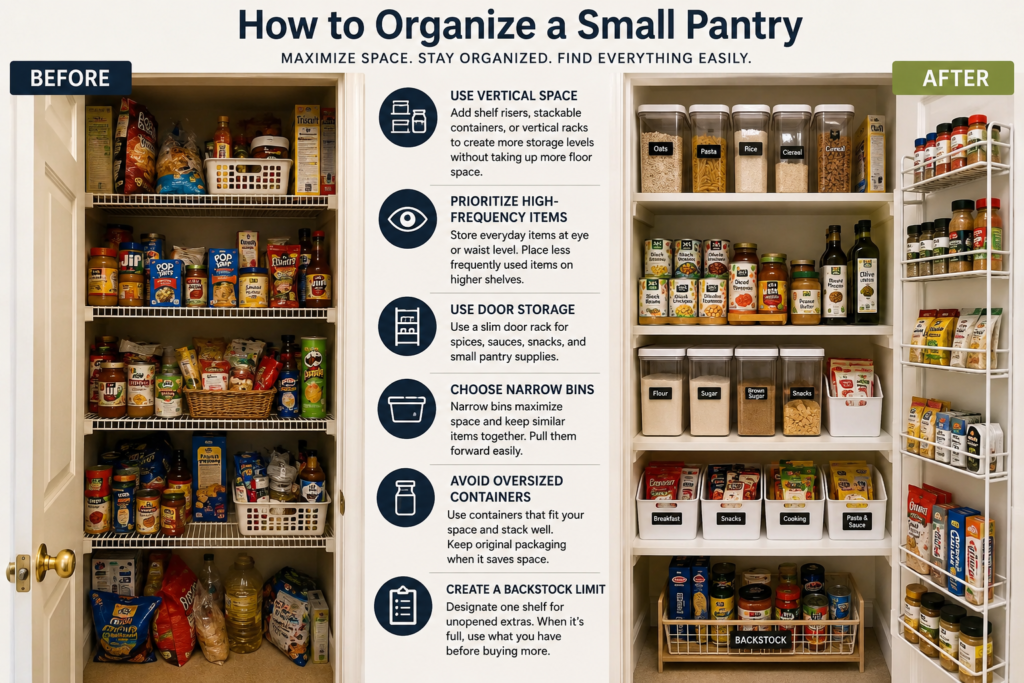
Small pantry organization before and after, using vertical storage, narrow bins, and door racks to maximize space.
How to Organize Deep Pantry Shelves
The best way to organize deep pantry shelves is to make every item accessible from the front instead of stacking food where products disappear at the back. Pull-forward bins, turntables, shelf risers, and clearly defined zones can turn deep shelves into usable storage without requiring constant rearranging.
Why Deep Shelves Become “Dead Space”
Deep shelves often provide plenty of capacity but poor accessibility. When items are placed several rows deep, products at the back become difficult to see and reach. They are easily forgotten, which can lead to duplicate purchases, expired food, and unnecessary clutter.
The solution is not simply to fill the shelf more efficiently. The goal is to reduce the number of items that must be moved before you can reach what you need.
Use Pull-Forward Bins
Pull-forward bins are one of the most practical solutions for deep pantry shelves. Instead of reaching behind several packages, you can slide one container forward and see its contents at once.
Use separate bins for categories such as snacks, pasta, sauces, or packaged cooking ingredients. Choose containers that fit the shelf width and leave enough clearance to pull them out comfortably.
Avoid creating overly broad categories. A bin labeled “Food” may hold too many unrelated products, while a bin dedicated to “Pasta & Grains” is easier to manage.
Use Turntables in Corners
Corners are particularly difficult to access on deep or L-shaped pantry shelving. A turntable, or lazy Susan, allows jars and bottles to rotate toward the front instead of remaining hidden behind other products.
They work best for sauces, condiments, oils, spreads, and other items with similar heights. Keep the surface relatively uncluttered so individual products can be removed without knocking others over.
Add Risers for Cans
Cans stored directly on a deep shelf often create multiple hidden rows. A tiered shelf riser raises the back row, allowing labels to remain visible.
Arrange cans with older products toward the front and newer purchases behind them. This makes stock rotation easier while reducing the need to remove an entire row to find a specific can.
Keep Backstock Behind Everyday Items
Deep shelves can work well for backstock, but only when the storage order is intentional. Keep everyday items toward the front and unopened extras behind them.
For example, place the cereal currently in use at the front and reserve the rear section for unopened boxes. When the front package runs out, the next item is already waiting behind it.
This approach turns shelf depth into an advantage rather than a source of clutter.
Use Zone Labels Instead of Individual Labels
Labeling every container can create unnecessary visual clutter and maintenance work. For deep pantry shelves, zone labels are usually more useful than individual product labels.
Use broad but specific categories such as “Snacks,” “Baking,” “Canned Goods,” or “Backstock.” The label defines where a group belongs, while the visible packaging identifies the individual product.
A well-designed zone should also reflect how your household actually uses the pantry. If one category is accessed several times a day, give it the most accessible position rather than following a purely alphabetical system.
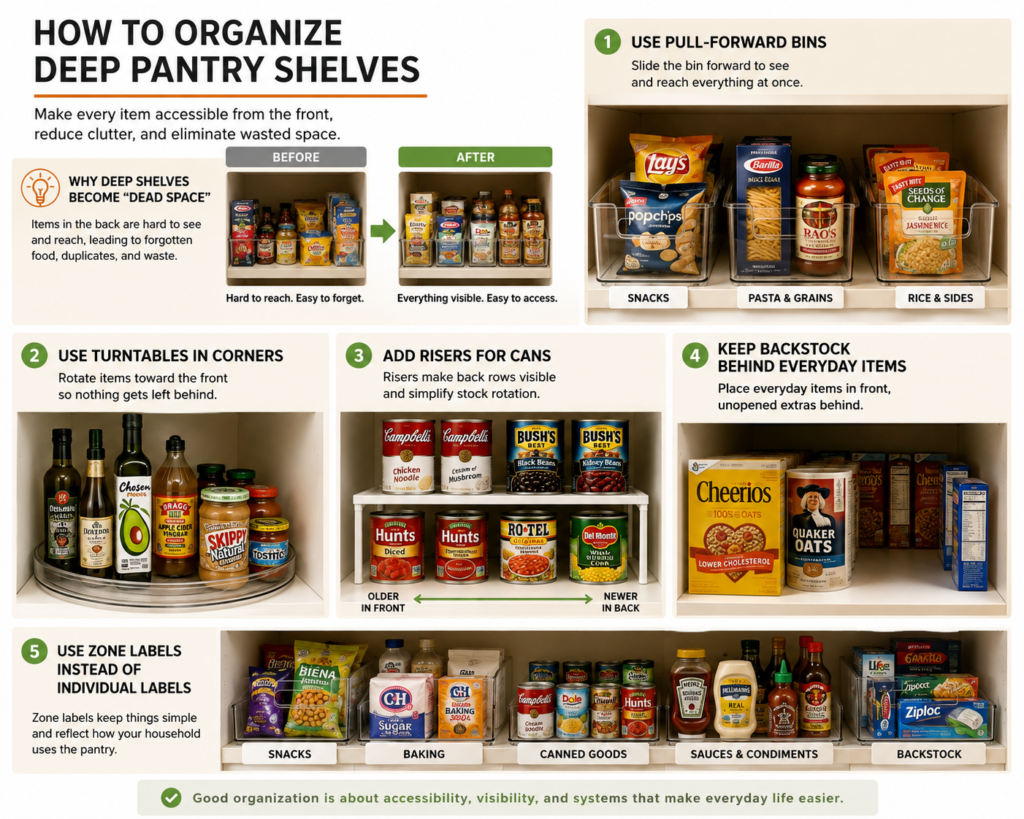
Learn how to organize deep pantry shelves using pull-forward bins, turntables, shelf risers, backstock storage, and labeled zones.
How to Organize Pantry Food by Category
Categorizing pantry inventory by usage frequency and meal preparation stage eliminates visual clutter and cuts grocery waste. Grouping similar items into distinct functional zones creates an intuitive workflow, ensuring you can audit your stock in seconds before cooking or shopping.
Snacks
Store grab-and-go items-nuts, dried fruit, crackers, and snack bars-in open, transparent acrylic bins at mid-to-lower shelf height. Removing items from bulky outer cardboard packaging frees up nearly 30% more shelf volume. For family households, designate a low, dedicated snack bin to give children independent access while keeping higher shelves tidy.
Breakfast Foods
Consolidate cereals, rolled oats, pancake mixes, and breakfast spreads onto a single high-turnover shelf. Decant bagged grains and cereals into clear, airtight containers with pour spouts to preserve crispness and maintain uniform vertical lines. Group coffee pods, tea bags, and breakfast sweeteners right beside them to streamline morning routines.
Baking Supplies
Flour, granulated sugar, baking powder, and cocoa powder require cool, dry conditions away from humidity-prone areas. Store bulk dry ingredients in wide-mouth, gasket-sealed canisters that accommodate measuring cups. Place small vanilla extract bottles, food colorings, and sprinkles together in a shallow organizer bin or portable caddy.
Pasta & Grains
Dedicate a middle shelf to dry carbohydrates: rice, quinoa, couscous, and assorted pasta shapes. Transfer loose bags into tall, modular rectangular containers to maximize vertical depth and guard against pantry pests. Group quick-cooking grains separately from slow-simmering legumes to speed up weeknight dinner prep.
Canned Goods
Arrange canned vegetables, beans, soups, and tomatoes using tiered stadium risers or front-loading gravity can dispensers. This setup keeps back rows visible without blind spots. Apply the First In, First Out (FIFO) rotation: place newly purchased cans behind older ones to prevent items from expiring unnoticed.
Spices & Seasonings
Keep everyday seasonings, rubs, and whole spices organized using a tiered drawer insert or a wall-mounted door rack. Storing spice jars with uniform, top-facing or front-facing labels prevents duplicate purchases. Avoid storing dry spices directly above the stovetop, as rising heat and steam degrade essential oils and reduce shelf life.
Oils & Sauces
Place cooking oils, vinegars, and unopened condiments on a lower, easy-to-wipe shelf lined with a silicone or plastic mat. Oil bottles inevitably leave sticky residue positioning them on a rimmed turntable (Lazy Susan) allows effortless 360-degree access while keeping messy drips off pantry shelves.
Bulk & Backstock
Reserve the bottom floor space or uppermost shelves for oversized club-store refills, multi-packs, and secondary stock. Contain these items in sturdy, labeled solid bins so surplus inventory stays neat. Always check this backstock zone before drafting your weekly grocery list to prevent duplicate spending.
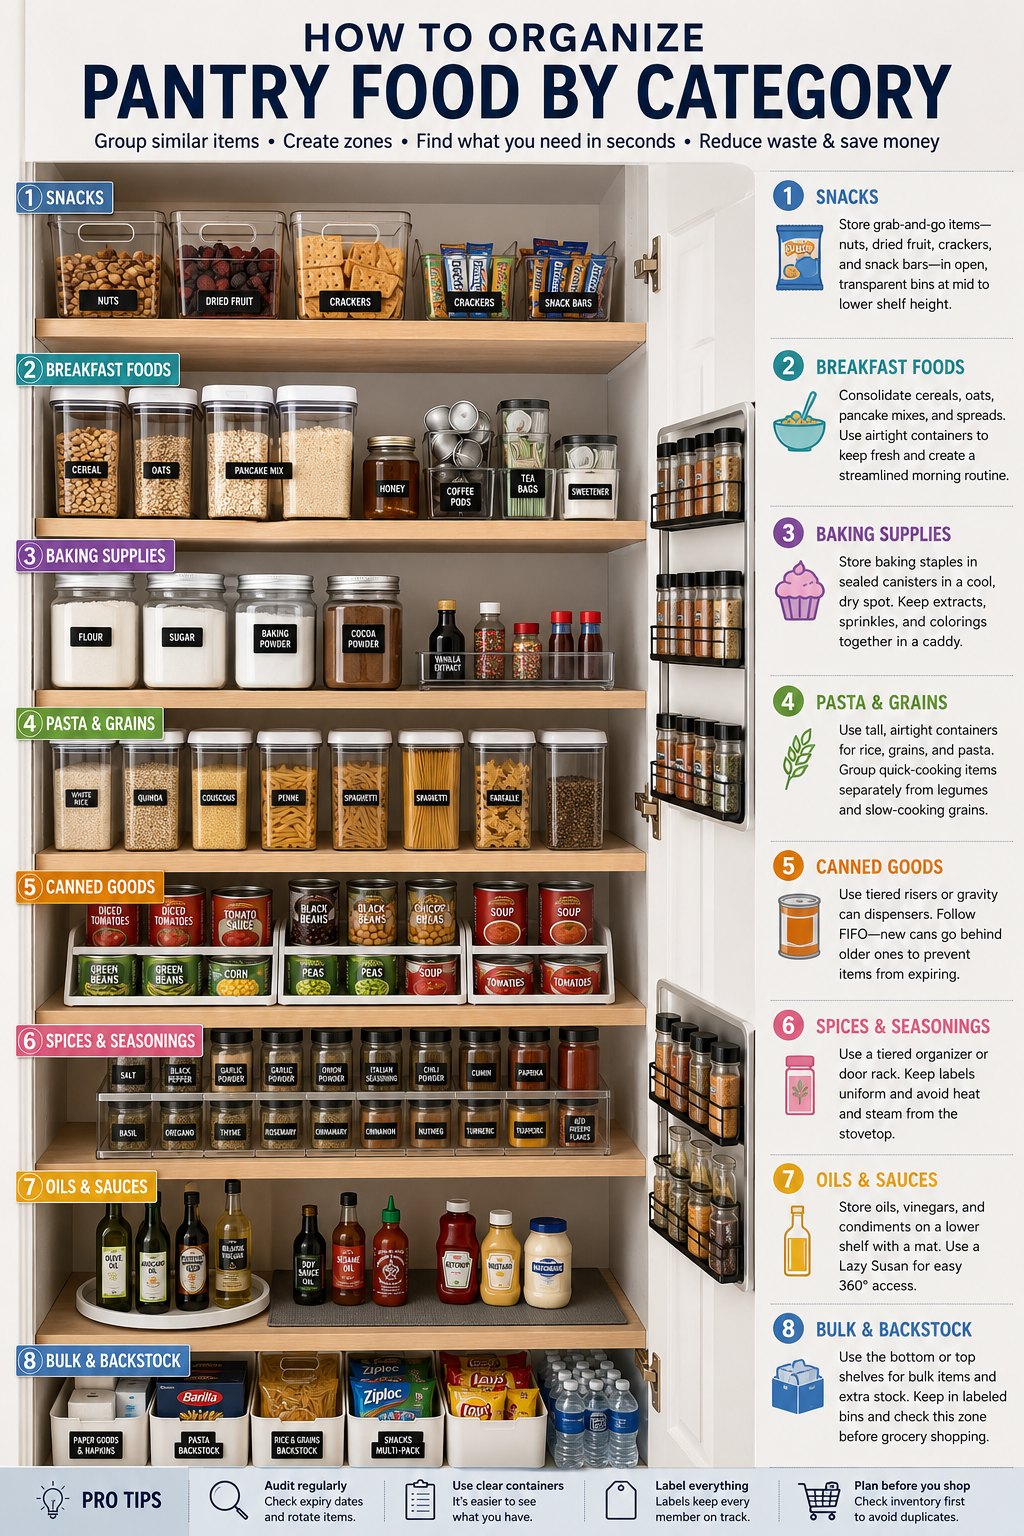
A well-organized pantry arranged by food category, with clear containers, labeled bins, and easy-to-access storage zones.
Pantry Organization on a Budget
You do not need an expensive storage system to organize a pantry effectively. The biggest improvements usually come from decluttering, grouping similar items, and making existing shelf space easier to access. Spend money only where an organizer solves a specific storage problem.
What You Can Reuse
Before buying anything, look around your home for containers that can be repurposed. Small baskets, sturdy boxes, food-safe containers, and shallow trays can separate categories and stop loose packages from spreading across shelves.
Existing jars may also work for dry goods if they are clean, suitable for food storage, and have secure lids. Even a simple cardboard box can temporarily function as a category bin for packaged foods.
The key is consistency of use, not whether every container matches.
What Is Worth Buying
Buy organizers when they improve access, visibility, or usable capacity. Shelf risers are useful when tall shelves leave significant unused space. Clear bins can make small packages easier to contain, while a lazy Susan can solve an awkward corner.
Measure the pantry first. An inexpensive organizer that fits correctly is more useful than a premium product that wastes shelf width or blocks access.
Prioritize durable pieces for areas you use every day. Frequently handled bins and containers benefit more from sturdy construction than storage used only occasionally.
What You Probably Don’t Need
Avoid buying organizers simply because they look attractive in a perfectly styled pantry. Decanting every food item into matching containers is rarely necessary, particularly when the original packaging is compact, resealable, and easy to identify.
You also may not need specialized racks for every category. If cans already stack safely and remain visible, adding another organizer may create more clutter rather than less.
A useful test is simple: What specific problem will this product solve? If there is no clear answer, keep the shelf space and skip the purchase.
Prioritize Organizers by Impact
Start with the storage problems that affect your routine most often. If food disappears at the back of deep shelves, prioritize pull-forward bins. If products are difficult to see, consider risers. If a corner is hard to reach, a turntable may provide more value.
Think in terms of accessibility per dollar, not the number of organizers you own. A small pantry may need only a few well-chosen pieces to become significantly easier to use.
The most budget-friendly pantry is not the one with the cheapest containers. It is the one where every organizer earns its space and nothing is purchased without a practical purpose.
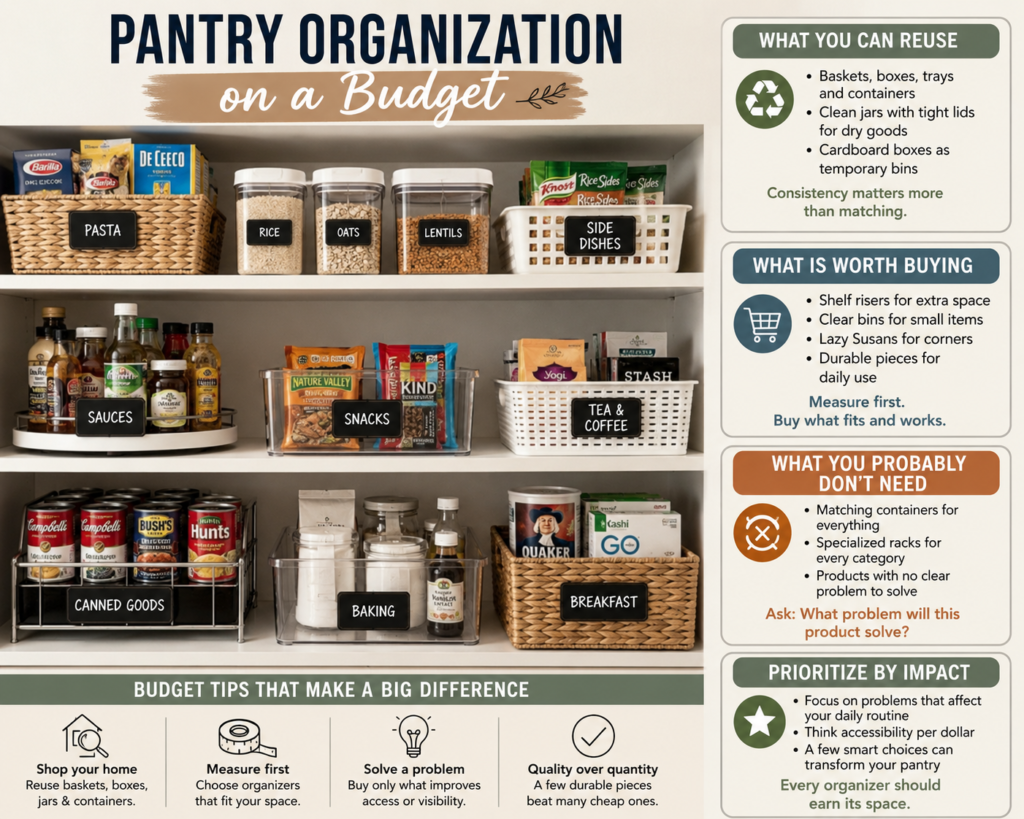
Simple pantry organization ideas that save money.
How to Keep Your Pantry Organized Long-Term
A pantry stays organized when maintenance becomes part of your normal routine. Instead of waiting for shelves to become cluttered, use a few simple habits: reset weekly, check dates monthly, rotate older food forward, track essential groceries, and limit backstock. These steps take little time but prevent the need for frequent full reorganizations.
5-Minute Weekly Reset
Set aside five minutes once a week to return misplaced items, straighten containers, remove empty packages, and bring older products forward.
Focus on the areas that receive the most daily traffic rather than trying to reorganize the entire pantry. A short reset is easier to maintain than an occasional deep clean.
Monthly Expiration Check
Once a month, scan the pantry for expired or damaged food and check products that have been open for a long time.
Pay particular attention to items pushed toward the back of deep shelves. A clearly defined “use soon” area can help you notice products that should be consumed before buying replacements.
FIFO Restocking
Use FIFO (first in, first out) when adding groceries. Move older products toward the front and place newer purchases behind them.
This works especially well for canned goods, grains, sauces, snacks, and other shelf-stable foods. It also makes the next item easier to identify without searching through the entire shelf.
Grocery Inventory
Keep a simple inventory of frequently purchased staples rather than recording every item in the pantry.
Track products such as rice, pasta, flour, cooking oil, coffee, canned goods, or other household essentials. Check the list before shopping and update it when stock runs low.
For many households, a short list stored on a phone is enough. The goal is to prevent duplicate purchases, not create another chore.
One-In, One-Out Rules for Backstock
Backstock becomes difficult to control when every shopping trip adds more unopened products. Set a practical limit for each staple based on how quickly your household uses it.
When the designated backstock space is full, use existing inventory before buying more. A simple one-in, one-out rule can also work: when you add another duplicate item, make sure an existing one is already being used.
The result is a pantry that stays visible, accessible, and easy to restock without requiring a major reorganization every few months.
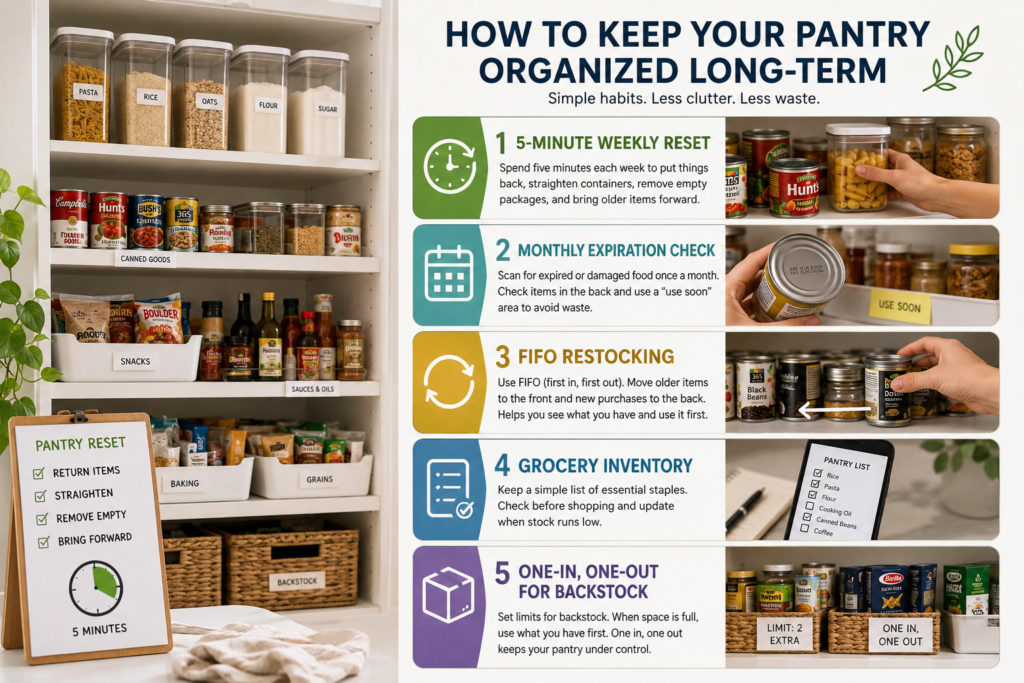
Simple pantry organization habits help keep food visible, accessible, and easy to restock long-term.
Conclusion How to Keep Your Pantry Organized
Organizing a pantry does not require expensive containers or a perfectly styled setup. The most effective pantry organization system is one that makes everyday food easy to see, reach, use, and restock. Start by decluttering, grouping similar foods, creating practical zones, and using storage solutions that fit your shelves. For small or deep pantries, focus on vertical space, pull-out bins, shelf risers, and accessible storage. Finally, maintain the system with regular resets, FIFO rotation, and a simple backstock limit. When your pantry is organized around how your household actually uses it, keeping it tidy becomes easier and more sustainable over time.
Recommended For This Guide
Tested, high-rating storage essentials used by professional organizers in this article.
 Best Seller
 Best Seller
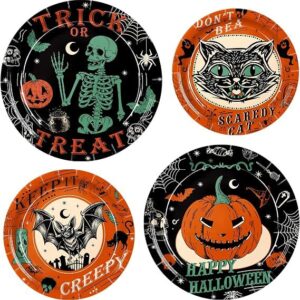
Vintage Halloween Party Paper Plates Set (48-Pack / 400GSM Heavy-Duty – 9″ & 7″)
 Best Seller
8 Ft Inflatable Halloween Ghost & 5 Pumpkins Yard Decoration with Built-In LEDs (Outdoor & Lawn Weatherproof Blow-Up Decor)
Frequently Asked Questions
What is the best way to organize a pantry?
The best way to organize a pantry is to declutter first, group similar
foods together, create practical zones, use accessible storage, and
maintain the system with regular resets and FIFO rotation.
How do you organize a small pantry?
Use vertical space, narrow bins, adjustable shelving, and door storage.
Keep frequently used foods at eye level and limit backstock to avoid
overcrowding.
How do you organize deep pantry shelves?
Use pull-out bins, turntables, shelf risers, and clearly defined zones
so items at the back remain visible and accessible.
How do you organize a pantry on a budget?
Start by decluttering and reusing containers you already own. Buy
organizers only when they solve a specific problem such as poor
visibility, wasted vertical space, or difficult access.


The tip about measuring shelf depth twice before ordering clear acrylic bins completely saved me! I used to guess and end up with containers sticking out. Swapping to uniform slim hangers also doubled my wardrobe space instantly.
So happy to hear that Emily! Measuring clearance is the #1 secret professional organizers use. Enjoy your newly transformed space!
Great guide! Are the TidyVo acrylic bins dishwasher safe or hand wash only?